

Roll out CloudCard to your team
A checklist for admins to brand your cards, add your people and get everyone sharing.
PlansProPremiumCompare plans
ForAdmins
On this page
This is the order we suggest for getting a whole team onto CloudCard. Each step links to a detailed guide.
Before you start
- You need the admin role in your organisation. If you signed up yourself, you already have it.
- Adding team members needs the Pro or Premium plan. On Free, Team Members in the sidebar shows a lock and an Upgrade to Pro panel. See Compare plans.
- Make sure your plan has enough cards for everyone. See Add more cards to your plan.
1. Set your company’s look first
Do this before you invite anyone, so every new card arrives fully branded.
- In the sidebar, click Company Settings.
- On Template Settings, set your logo, colours, background, banner and template. See Set up your company branding and Choose a card template.
- Set the button visitors tap on every card. See Set the call-to-action button.
- On Fields, decide which fields people can change and which stay fixed, such as the company address and website. See Control which fields users can edit.
2. Add your people
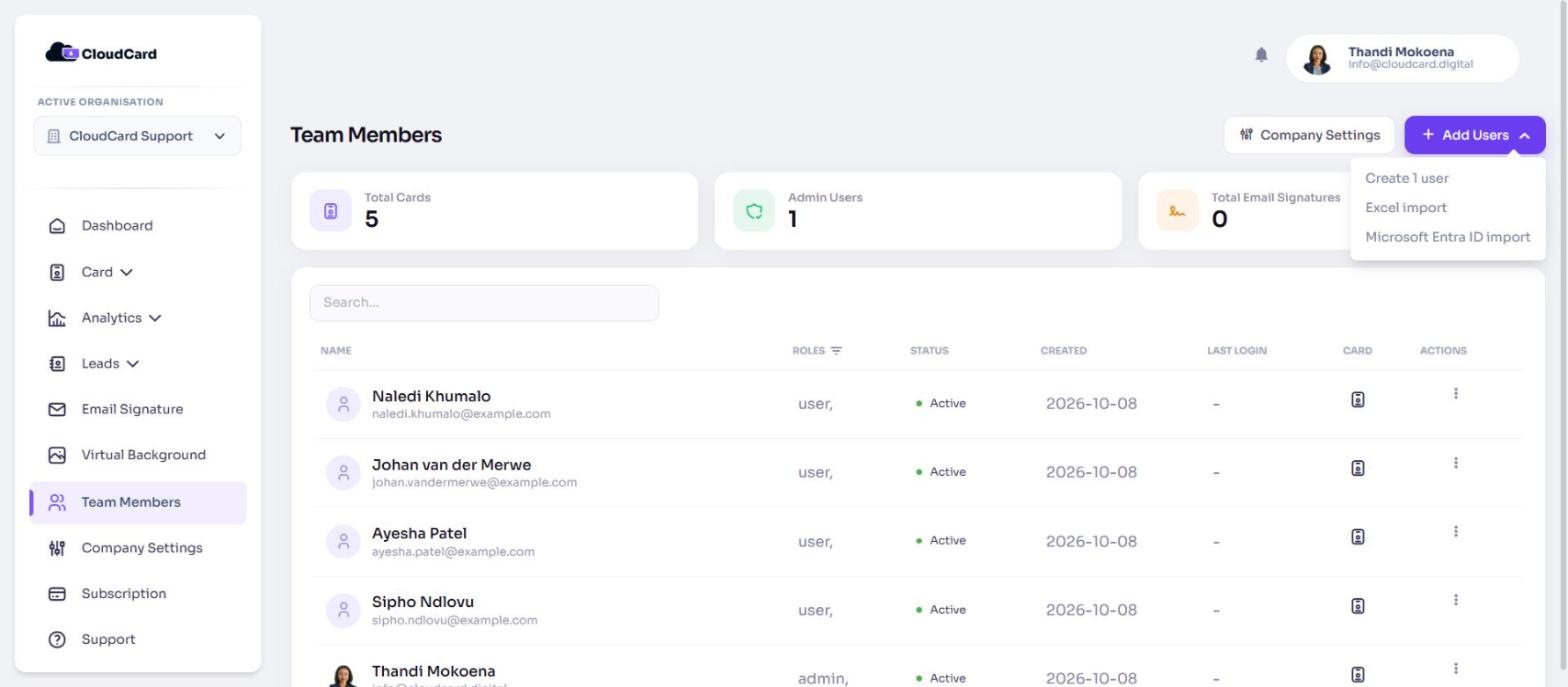
In the sidebar, click Team Members, then Add Users. Choose how to add them:
- Create 1 user: for one or two people. See Add a user.
- Excel import: for a list of people in a spreadsheet. See Import users from Excel.
- Microsoft Entra ID import: to keep CloudCard in sync with your Microsoft directory. See Connect Microsoft Entra ID.
Each person gets an email with a link to their card and a Set your password button. Point them to Your company gave you a CloudCard: start here.
3. Choose who else can manage CloudCard
Give at least one other person the admin role, so you’re never the only one who can make changes. See User roles and Make someone an admin.
4. Tighten sign-in security (optional)
- Turn on emailed sign-in codes for people who need them. See Turn on two-factor authentication for a user.
- If you use Microsoft 365, let people sign in with their work Microsoft account. See Sign in with Microsoft.
5. Get everyone sharing
Send your team these guides:
6. Follow up
- If someone hasn’t set their password, reinvite them.
- See who’s using their card in Organisation analytics.
- Turn on lead capture so visitors can share their details back. See Turn on the lead capture form.
Was this article helpful?
Thanks for letting us know.
Still stuck?
Send us a message and we'll know which article you were reading. Or email [email protected].